Headlines

Showing posts with label windows. Show all posts

How to Block Devices on Your Wi-Fi Network

4:46 PM

Block Devices on Your Wifi Network

want to block someone on your Wifi network? Well, this article is for you. There are many reasons to block someone on your Wifi such as someone is using your Wifi without your permission, your network speed is to slow because of multiple devices connected to it. If you find yourself in a situation where you want to block your neighbor, your roommate, your friend or anyone on your Wifi network, keep reading this post and follow the step by step procedure to block anyone on your Wifi router.
The MAC (media access control) filtering can be used to allow or block a number of devices on a Wifi router. In this article, I’ll show you how to block any device on a Wifi network.

Steps to block a device on Wifi network

To block a device from using your Wifi network, follow the step by step process given below
Note: I have tried this process on TP-Link Wifi router, the same procedure needs to be followed for other routers too, but some values and names may vary depending on the manufacturer and firmware version of the router.
Step 1: power on your Wifi router and connect your PC to the router.
Step 2: open any web browser available on your computer (we have used chrome) and type http://192.168.0.1 in the address bar of web browser and press the enter button.
Step 3: on the next screen, you should see a login page asking for username and password, enter the username and password for your router and click the login button.


Note: the default username and password for TP-link routers are admin and admin respectively. if you have a different router then refer to your router’s manual to find the default username and password.

Step 4: Once you click the login button, you will be redirected to the admin panel of your router.

Step 5: On the admin dashboard, locate the wireless option mostly appears at the left side of the window.

Step 6: choose the wireless statistics option under the wireless tab. Here you will see a list of devices connected to your Wifi router along with their MAC address (see the picture below).


Step 7: Copy the MAC address of the device you want to block on your Wifi network.

Step 8: Now, go to Wireless MAC Filtering option under the Wireless tab.

Step 9: Now, you need to enable mac filtering to block a device on your Wifi. To do that, click on enable button adjacent to Wireless MAC filtering.


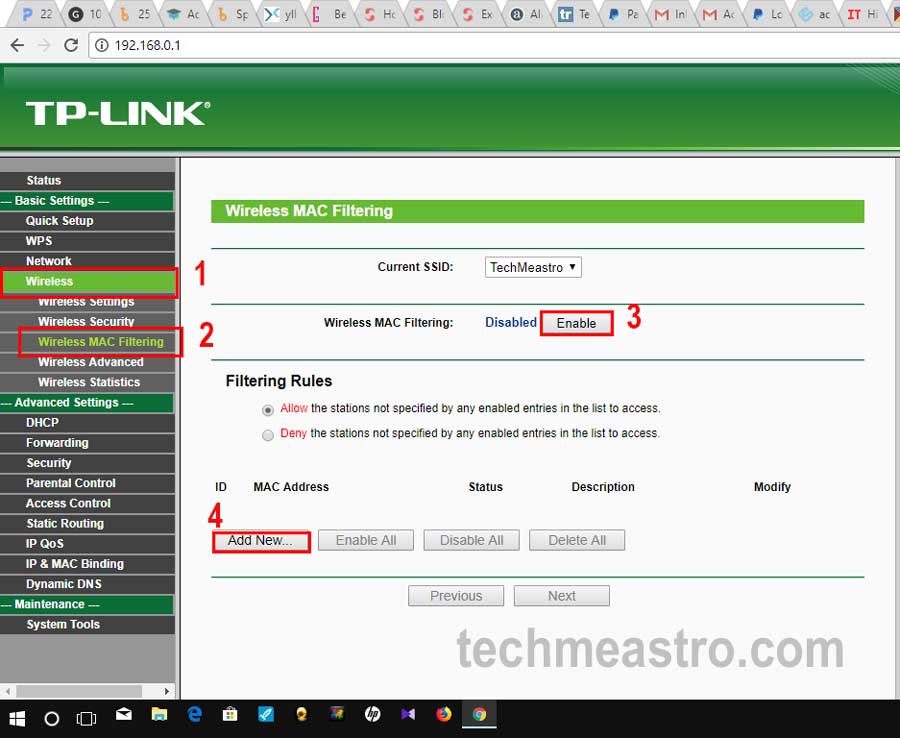
Step 10: Once you enable Wireless MAC filtering, now you need to add the device you want to block on your Wifi network. Click on Add New button appeared at the bottom of the middle-window (ass highlighted in the above picture).
Step 11: On the next screen, paste the mac address of the device you want to block, enter a description, set status as enabled and click the save button to apply changes. Sometimes you may be asked to reboot your device to apply the changes to your router. In that situation, reboot your device to apply changes.


That’s it. You will see that the device has been blocked from your Wifi network. If you want to unblock this device, go with the same procedure and delete this device from Wireless MAC filtering list.


Hopefully, you have understood the process to block devices on your Wifi router. Having trouble in blocking devices on your Wifi network? Please let us know in the comment below.

How to find Tags of any Video on YouTube | YouTube Keyword Research

5:20 PM
How to Find Tags of YouTube videos

If you are a YouTuber and want to make your video appear first on YouTube search result, sometimes you may need to know tags of a YouTube video which is already ranking first in YouTube search result for the same keywords as yours. For example, you made a video on how to make your video appear firsts on YouTube search result and you just searched on YouTube for the same keyword (for keyword research purpose) and you found that there is already a video which is ranking first for the same keyword. Then you'll definitely want to know tags of that video to apply them to your own video and get a lot more views on your video. Although, YouTube does not allow you to know other’s videos tags directly but there are many methods to find tags of YouTube videos such as finding tags of any YouTube video from source code which is very complex and time-consuming method but I’m going to show you a simple and less time-consuming method to find tags of any YouTube videos directly on YouTube watch page.

here is a simple method by which you can easily find tags of any video on YouTube. read on.

The stepwise process to find tags of any YouTube videos

Step 1: Open Chrome Web Store (go to chrome://apps/ and click on web store) or if you are using Firefox, go to extension and search for the term “TubeBuddy for YouTube”. A TubeBuddy plugin will appear in the search result (see the picture below).


Step 2: Click on add to chrome. An add extension Pop-up will appear as shown in the picture below. Click on ad button.


Step 3: You have successfully installed TubeBuddy plugin. Now you need to Sign-in for TubeBuddy using your YouTube account. Click on Sign-in as shown in the picture below.


Step 4: Click on “Sign-in with YouTube button”. (see the picture)


Step 5: you have successfully Signed-in for TubeBuddy. Now you can search on YouTube for any keyword and easily find tags. Search for any keyword or any title on youtube, you will also get a search explorer tab appeared on the right side of the YouTube search result as shown in the picture below. This search explorer will show you related searches for the same keyword you searched for, which will help you in deciding a good title for your video.


Step 6: Now, its time to find the tags of videos. Click on any video appeared in the search result. when you click on the video, the YouTube watch page will appear along with tag explorer on the right side. now you can easily copy those tags and apply on your video.


To copy those tags, click on “copy to” appeared on the bottom-right corner of tag explorer and copy all tags or selected tags and paste them where you want.

To get more Tips and Tricks like this, please Subscribe to our Newsletter and stay updated with us. Don't forget to share your feedback in the Comment below.

Top 10 CMD Commands used in Hacking

9:22 PM
Top 10 Commands used in Hacking

CMD or Command Prompt is the Command-line interpreter on Windows Operating System. It provides access to over 2000 commands in windows. Hackers uses this command-line interpreter to run commands and access information from a remote computer or other devices.

Today I’m sharing Top 10 CMD Commands used in Hacking. If you are a beginner and want to learn Hacking, you should know these most important CMD Commands Used in Hacking. If you haven’t tried some of them, just open your CMD, type command and see the result.

ping
ipconfig
net use
net user
tracert
netstat
arp
route
nbtstat
nslookup

Let’s discuss about each command in short

1. Ping
Ping command is used to test the ability of the source computer to reach the destination computer. This command is usually used to verify the connection status of the source computer to the destination computer.

Syntax
There are two ways to ping

i. if you know the IP address of the Destination
ping x.x.x.x (here x is the IP address you want to ping)

    ii
ii. if you know the IP address of the Destination
ping www.google.com (here www.google.com is the website you want to ping)

2. ipconfig
This command displays all current TCP/IP network configuration like DNS (Domain Name System) setting, subnet mask, IP address and Default gateway.

Syntax
ipconfig /all: Displays the full TCP/IP configuration fo all adapters.
ipconfig renew: Renews DHCP configuration
ipconfig release: Send a message to DHCP to release current DHCP configuration.
flushdns : Flushes and resets the contents of the DNS client resolver cache (discard cache entry)
ipconfig display DNS: Display the contents of the DNS client resolver cache.

3. net use
This command is use to connect, remove, and configure connections to shared resources.

syntax
net use: to show detailed information about currently mapped resources like printers or drives.
netuse [device name]: to specify the drive letter or printer port you want to map.

4. net user
Use this command to create and modify user account on computer. Usually used by administrator to manage users.

Syntax
net user [username [password | *] [options]] [/domain]
               username {password | *} /add [options] [/domain]
               username [/delete] [/domain]

5. tracert

This command is used to show the details about the path that a packet takes while traveling from source to destination.

Syntax
tracert x.x.x.x (x is the IP address)
tracert www.google.com (www.google.com is the website)

6. netstat
This command is used to show the details about individual connections, network statistics and much more.

Syntax
netstat -a: display active TCP connections
netstat -e: to show statistics about network connection
netstat -n: to show all the open connections with IP addresses

7. arp
This command is used to display and modify entries in the Address Resolution Protocol (ARP) cache. It will show one or more tables (called ARP tables) used to store IP addresses and their resolved token ring physical addresses.

Syntax
arp -a: display the current ARP cache table for all interfaces

8. route
You can use route command to view, add and delete routes on from routing table

Syntax
route print: print a route
route add: add a route
route delete: delete a route

9. nbtstat
The nbtstat command removes and corrects preloaded entries using a number of case-sensitive switches

syntax
nbtstat -a <remotename>: returns the local NetBIOS name table for that remote computer
nbtstat -a <remotename>: returns the remote machine’s name table given its IP address

10. nslookup
This command is an external command used to resolve external DNS into IP address.

Syntax
Nslookup
Nsloolup [name]


These are the Top 10 CMD Commands used in Hacking. hope you’ll find this useful. If you know any important command not available in the list above, mention them in the comment.

How to Create a Quick Shutdown Button in Windows 10 and Windows 8

10:59 AM
Shutdown Button for Windows 10, Windows 8
We have noticed that there are 2-3 steps required to shut down Windows 8 and Windows 10. To shutdown windows 8 you have to scroll your cursor to the Top-Right corner then you have to click power icon. Windows 10 also takes approximately the same amount of time to shut down.

Today, I am going to show you how to create a Quick Shutdown button for window 10 and window 8 by which you can quickly shut down your system by double-clicking the shutdown shortcut button.

Steps to create shutdown shortcut button for windows 10


Step 1: Right-click on your desktop, point to new and select shortcut from the list. (a create shortcut window will appear).


Step 2: In the create shortcut window, type shutdown -s - t – 30 in the empty box and click next. As shown in the picture below. (Here, 30 is the time in second, if you want to shut down your system more quickly set this value to 10 or 15).


Step 3: tap Finish to complete the process.


The same process needs to be followed to create Quick Shutdown button in windows 8 also. 
 
Copyright © Tech Tips and Tricks